
This tutorial describes how to set up database replication in MySQL. MySQL replication allows you to have an exact copy of a database from a master server on another server (slave), and all updates to the database on the master server are immediately replicated to the database on the slave server so that both databases are in sync. This is not a backup policy because an accidentally issued DELETE command will also be carried out on the slave; but replication can help protect against hardware failures though.
1 Configure the Master
Edit /etc/mysql/my.cnf:
Under the section [mysqld] add the following lines or comment out if already present
#skip-networking
#bind-address = 127.0.0.1
And again in /etc/mysql/my.cnf under [mysqld] section add
server-id=1
skip-name-resolve
log-bin=/var/log/mysql/mysql-bin.log
binlog-do-db=wpdb
Replace wpdb with your database name
Restart the mysql server
root@master# /etc/init.d/mysql restart
Then we log into the MySQL shell as root and create a user with replication privileges:
root@master# mysql -u root -p
Enter password:
GRANT REPLICATION SLAVE ON *.* TO 'slave_user'@'%' IDENTIFIED BY 'some_password';
FLUSH PRIVILEGES;
Replace slave_user, some_password with your data.. also % can be replaced with your slave server ip address
Next, on same MySQL shell
USE wpdb;
FLUSH TABLES WITH READ LOCK;
SHOW MASTER STATUS;
quit;
It will show something like this:
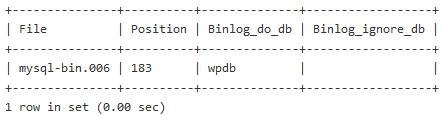
Write down this information, you will need it later on the slave (in this case the info are mysql-bin.006 and 183)!
Now it is time to dump the wpdb database, on the linux shell prompt run the following command:
root@master# mysqldump -u root -p wpdb >wpdb.sql
Enter password:
Upload your database (wpdb.sql) on the slave server
Now go back to the MySQL shell
root@master# mysql -u root -p
Enter password:
And type
UNLOCK TABLES;
quit;
2 Configure The Slave
On the slave we first need to create the database wpdb:
root@slave# mysql -u root -p
Enter password:
CREATE DATABASE wpdb;
quit;
Import the database dump you made on the master into the newly created wpdb on the slave:
root@slave# mysql -u root -p wpdb < wpdb.sql
Enter password:
Now edit /etc/mysql/my.cnf on the slave server
Add the following lines under [mysqld] section
server-id=2
skip-name-resolve
replicate-do-db=wpdb
relay-log=/var/log/mysql/mysql-relay-bin.log
log_bin=/var/log/mysql/mysql-bin.log
master-host=master_ip_address
master-user=slave_user
master-password=some_password
master-connect-retry=60
Replace master_ip_address, slave_user, some_password with your data
In case you have MySQL 5.5+ The following options have been removed, just add to my.cnf the first 5 lines above and skip the master-* ones
–master-host

–master-user

–master-password

–master-port

-master-connect-retry
Restart the MySQL server
root@slave# /etc/init.d/mysql restart
Enter again the MySQL shell
root@slave# mysql -u root -p
Enter password:
SLAVE STOP;
CHANGE MASTER TO MASTER_HOST='master_ip_address', MASTER_USER='slave_user', MASTER_PASSWORD='some_password', MASTER_LOG_FILE='mysql-bin.006', MASTER_LOG_POS=183, MASTER_PORT=3306;
START SLAVE;
quit;
MASTER_HOST is the IP address or hostname of the master server.
MASTER_USER is the user we granted replication privileges on the master server.
MASTER_PASSWORD is the password of MASTER_USER on the master server.
MASTER_LOG_FILE is the file MySQL gave back when you ran SHOW MASTER STATUS; on the master ( in this case mysql-bin.006 to be replaced with your value ) .
MASTER_LOG_POS is the position MySQL gave back when you ran SHOW MASTER STATUS; on the master ( In this case 183 to be replaced with your value ).
MASTER_PORT to set which port the master server is listening, optional if set to default 3306, be noted that master_port should not be quoted.
Restart MySQL on both master and slave server
Usefull MySQL commands
Details of slave replication:
SHOW SLAVE STATUS\G
Show process list:
SHOW PROCESSLIST;
List of MySQL user accounts:
select User,Host from mysql.user;
Delete a MySQL user:
DROP USER 'user'@'localhost';
Change password for a MySQL user:
update user set password=PASSWORD("NEWPASSWORD") where User='your user';
flush privileges;
Add a read-only MySQL user:
CREATE USER 'read_only_username'@'%' IDENTIFIED BY 'password'; <-- % can be replaced with an ip or hostname
GRANT SELECT ON *.* TO 'read_only_username'@'%'; <-- can read all databases
GRANT SELECT ON wpdb.* TO 'read_only_username'@'%'; <-- can read wpdb database only
Safest way to quickly rename a MySQL database:
$ mysqldump -u root -p olddb >~/olddb.sql
$ mysql -u root -p
mysql> create database newdb;
mysql> use newdb
mysql> source ~/olddb.sql
mysql> drop database olddb;
Fixing MySQL replication after slaves's relay log was corrupted
Slave_IO_Running was marked as Yes, but Slave_SQL_Running as No.
Last_Errno: 1594
Last_SQL_Errno: 1594
To fix the error, current binlog files on slave should be discarded and set new position. Before setting new binlog position it's important to get the values from the master.
On the master issue the following command in the MySQL shell:
mysql> show master status\G
*************************** 1. row ***************************
File: mysql-bin.000034
Position: 51997364
Binlog_Do_DB: wordpress
Binlog_Ignore_DB:
1 row in set (0.00 sec)
In the example above Relay_Master_Log_File: mysql-bin.000034 and Exec_Master_Log_Pos: 51997364
On the slave issue the following commands in the MySQL shell:
mysql> stop slave;
mysql> reset slave;
mysql> change master to master_log_file='mysql-bin.000034', master_log_pos=51997364;
mysql> start slave;
mysql> quit;
Done.
- Setting up HyperDB on WordPress
1 On the Slave server edit /etc/mysql/my.cnf under [mysqld] and change as below:
#bind-address = 127.0.0.1
#skip-networking
Restart MySQL server
root@slave# /etc/init.d/mysql restart
Add a MySQL user
root@slave# mysql -uroot -p
Enter password:
mysql> CREATE USER mysql_user@'wordpress_server_ip_address' IDENTIFIED BY 'mysql_user_password';
mysql> GRANT ALL PRIVILEGES ON wordpress_database_name.* TO mysql_user@'wordpress_server_ip_address';
mysql> flush privileges;
mysql> quit;
Replace mysql_user, wordpress_server_ip_address, mysql_user_password, wordpress_database_name with your data
2 On the WordPress server
Download hyperdb here, unzip and edit hyperdb/db-config.php
root@wordpress# wget https://downloads.wordpress.org/plugin/hyperdb.zip
root@wordpress# unzip hyperdb.zip
root@wordpress# vi hyperdb/db-config.php
Go to line 228
$wpdb->add_database(array(
        'host'     => SLAVE_IP_ADDRESS:PORT,     // If port is other than 3306, use host:port.
        'user'     => mysql_user,
        'password' => mysql_user_password,
        'name'     => wordpress_database_name,
        'write'    => 2,
        'read'     => 1,
        'dataset'  => 'global',
        'timeout'  => 0.2,
));
Replace SLAVE_IP_ADDRESS:PORT, mysql_user, mysql_user_password, wordpress_database_name with your data
Save and quit the editor
Copy the hyperdb files into the wordpress directories, db-config.php into same directory where wp-config.php is and db.php in the wp-content/ directory
root@wordpress# cp hyperdb/db-config.php /var/www/html/wordpress/
root@wordpress# cp hyperdb/db.php /var/www/html/wordpress/wp-content/
Replace /var/www/html/wordpress/ and /var/www/html/wordpress/wp-content/ with your wordpress paths
Once db.php is in place, hyperdb will be active. To disable remove db.php from wp-content/ directory
How to check if hyperdb is working
root@wordpress# mysql -h SLAVE_IP_ADDRESS -u mysql_user -P 3306 -p
Enter password:
If you can log into MySQL remotely then authentication is working
Shutdown the wordpress MySQL server and from a browser refresh your wordpress website.
If the website opens as usual it means the slave MySQL is working.
To be sure everything is ok restart wordpress MySQL and shutdown Slave MySQL server, refresh the Website and final
check shutdown both MySQL servers to get the usual error.
If between the above tests you are redirected to the initial wordpress installation wizard then add the following code to db-config.php, at the near end of the file, see below
        shm_detach( $segment );
        sem_release( $sem_id );

        return $row[ 'lag' ];
}

*/
function wpdb_connection_error( $host, $port, $op, $tbl, $ds, $dbhname, $wpdb ) {
        dead_db();
}
$wpdb->add_callback( 'wpdb_connection_error', 'db_connection_error' );
// The ending PHP tag is omitted. This is actually safer than including it.
Reference links
https://dev.mysql.com/doc/index.html
http://MariaDB.org
http://httpd.apache.org
http://nginx.org
https://wordpress.org
https://wordpress.org/plugins/hyperdb/


I am testing
$sql = “SELECT * FROM products”;
$products = $wpdb->query(
$wpdb->prepare( $sql, 13, ‘gargle’)
);
// not work